on
Git - The Important Parts
This blog post is the first part of a three-part series adapted from a GitOps webinar series which we co-produced together with our friends at VSHN.
In this first part, we will look at Git and what is important when using it in a team. The second part will be about Infrastructure as Code, a handy concept which helps to unify environments and be aware of the exact changes made to different parts of your infrastructure. In the third and last part, we will combine these ideas and delve into the concept of GitOps. Following these principles can help your team to improve the communication, investigate issues more easily and work more efficiently. Be aware, though, that there are several caveats when adapting these concepts. That’s why we will also look into some common pitfalls and speak about our experience getting teams started with these tools.
If you have questions, feel free to post them as comments on this blog post. If you would rather sit back and enjoy this part as a webinar, then you may head over to the recording on YouTube.
What is Git?
Let’s start by looking into what Git is and how it works. Git is a very common version control system that has evolved into one of the standard tools for modern software development. It helps us to keep track of changes to our source code. When collaborating in a team, it lets each developer work on their feature on a separate copy of the code without getting into each other’s way.
Furthermore, Git allows us to easily travel the history of our source code and understand changes by looking at the order they were made in and read the small pieces of documentation their authors have left us. This is hugely helpful when debugging code other people have written, or even code which I have written some time ago. I can jump around different points in time, see individual changes and even revert them to create a new fixed release.
We may take this for granted, but think about how finicky working with code in a big team would be without these features.
Commit Messages
As you may already know, in Git, developers make changes to source code in the form of so-called commits. A commit is a small set of changes to one, or multiple, files and contains information about the author and the time the changes were made.
To be able to understand these changes, developers are asked to document their commits with small pieces of text called “commit messages”. The quality of these is a vital part of the health of our code base. Making good commit messages helps our teammates and future selves to understand the purpose of changes and specific ways of implementation. If done well, they provide crucial information at a glance and are structured in a way that lets us browse and even search the history of changes of our code base.
Bad Commit Messages
First, let’s have a look at some bad commit messages and why they are bad. Then, we will look into how to improve them.
""
The worst commit message is obviously an inexistent one. Not adding a message to our commit is luckily considered bad practice by most engineers. It gives someone who browses our changes no context at all and leaves them to figure out the effect and purpose of our changes by themselves. It also does not make developers think about their changes and why they are making them in a certain way. This process is important because it helps developers make more conscious and focused changes.
A meaningless commit message like
did some stuff, now it works.
is clearly not much more helpful than not having a message at all.
Extended the flux capacitor and added a left-trim feature to the tractor beam and implemented the emergency self-destruct button.
Another indicator of a bad message is a very long commit message that contains the word “and” one or even multiple times. First, long messages are difficult to read and comprehend. Secondly, they strongly suggest that too many unrelated changes were crammed into a single commit. Such commits are hard to understand and manage and should be omitted. It is much easier to understand a set of small changes with a clear history documented in their individual messages than a huge commit which contains unrelated changes.
Good Commit Messages
Good commit messages, on the other hand, are clear and concise. They describe what the changes of the commit do in a human-readable way and do not contain any superfluous punctuation or words. Good examples are
Upgrade lodash dependency
Fix typo in README
Return correct error codes for all errors
These examples can easily be read and understood without knowing the whole context of the application.
So, in summary, the most important rule about good commit messages is to write them at all and to write them in a concise format that can easily be understood by others and our future self.
Commit Message Body
So far, we have only covered the subject of a commit message, which is the first line. Most people use only the subject line to describe their change, which is sufficient for almost any commit. If, however, a commit is a bit more involved or the changes and the rationale behind it cannot be easily understood, it can be helpful to explain the commit in a more verbose form. That’s what the body of a commit message is for. Here you can see an example of a commit message containing a concise subject line and a body that explains it further.
Return correct error codes for all errors

We used to always return 500 error codes from our HTTP API. This is not according to the HTTP specification. Because of that, this commit changes the API to return correct 4XX and 5XX error codes respectively.
The body is separated from the first line by a blank one and is written in proper language to make it easily readable for our peers. It is mostly used to explain why a commit was made. If necessary, it can also be used to explain the changes themselves in a more explicit way if they cannot be understood intuitively.
Commit Message Guidelines
To write proper commit messages, there are a few guidelines to follow. This helps us to standardize the formatting of commits within our team and to follow the guidelines Git itself abides to when making commits, for example when it creates a merge commit.
Separate the subject from the body with a blank line
Firstly, we should separate the subject from the body with a blank line, if there is a body at all. This helps Git tooling to parse the commit message correctly and for human eyes to quickly see that there is a subject line and a separate body that helps us further understand the rationale behind the commit.
Limit the subject line to 50 characters
Secondly, it is helpful to limit the subject line to around fifty characters. This is foremost a guide to keeping our messages concise and let people browse them more easily when reading a list of commits to find the right one. But it also makes sense because much of the Git tooling out there cannot show an unlimited number of characters when displaying commit messages.
Capitalize the subject line
The third good practice is to capitalize the subject line of a Git commit message. That makes it easier for people to see where it starts and to read it because it feels more natural.
Do not end the subject line with punctuation
The fourth guideline is that using punctuation in a commit messages unnecessarily lengthens it. Mostly, commit messages are not proper sentences and don’t deserve a period at the end anyway.
Use the imperative mood in the subject line
The fifth guideline is to use the imperative mood when writing them. That means to write them in the present tense and make them sound like an order. A good way of checking if your message follows this guideline is to think the sentence “If applied, this commit will…” and then appending your message. If that creates a sentence of proper English, you most likely used the imperative mood correctly.
There are also certain guidelines for the message body.
Wrap the body at 72 characters
Number six: The body should be wrapped at around 72 characters. The reason being that human eyes can most easily process text at that width. Since the body can contain long sentences of prose, it is helpful for readers to have the width limited to that amount.
Use the body to explain what and why versus how
The last and seventh good practice is to use the body to further explain the what and why of our changes. It should help a reader understand what changes were made and the reasoning behind the changes. It should not explain the code itself and tell the reader how the changes were made or how a certain problem was solved. That’s what code comments or actually intuitively written code is for.
Branching Strategies
Another important part to using Git are branches. You have probably used them, maybe to hold a specific feature that is not ready yet, or just to try something out. When working in a team, it is essential to adhere to a branching strategy everyone agrees upon. Depending on the size of your team and the complexity of the application it develops and releases, different ways of using Git can make sense. In the following, we will have a look at two of the most common branching strategies and when they make sense.
Gitflow
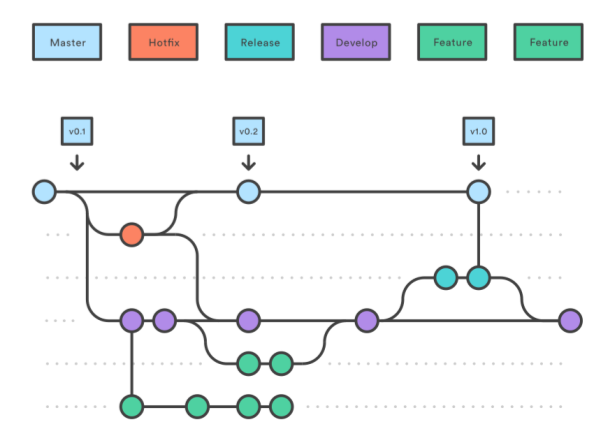
The first strategy is called “Gitflow”. It allows to easily collaborate and work on multiple features at a time.
The core of Gitflow is the so-called “develop” branch, indicated here in purple,
which is where all the work happens. To create a new feature, developers create
a feature branch, marked in green in the picture, off the develop branch. They
create one or multiple commits on that feature branch until they are happy with
their changes and think the feature is fully implemented and tested. As soon as
that is done, they create a so-called pull request. That means, they open up
their changes for review by their peers before they finally merge everything
back into the develop branch. This means that the develop branch should
always be in a healthy and deployable state and that feature branches are
short-lived because they get deleted once the feature is merged.
The second important branch in Gitflow is the master or main branch,
highlighted in blue, which contains only code that has already been released. It
ideally contains one commit per release, which is tagged with the respective
release number and should always remain stable and releasable.
But how do commits get from develop to the main branch?
Once the develop branch is ready to be released, a new release branch,
highlighted here in teal, is created off the develop branch where all the
commits that should be part of this release are collected. This can happen via
completely releasing the develop branch as is, or by cherry-picking certain
commits from “develop” into the release. Once the release is ready, the
respective branch gets merged into the master branch and properly tagged as a
clean release and then merged back into develop. By doing so, we make sure
that there are no changes on the master branch which are not on the develop
branch.
Obviously, it can happen that we create a buggy release. For that case, Gitflow
introduces the concept of hotfix branches. In the picture, we used orange for
those. We branch these off the master branch, make our necessary fixes and
then merge the hotfix branch back into master but also into develop. With the
new master branch containing these changes, we can then create a new release
which contains our hotfix.
So, in summary, we have the two main branches main and develop and by
creating feature-, release- and hotfix branches we implement new features and
hotfixes and merge them between the main branches. This makes Gitflow quite
structured yet flexible. However, it introduces some overhead, which can
especially be a lot of unnecessary strain for smaller teams. For larger and well
established teams, it can bring great value and structure to ease communication
and collaboration.
A big advantage of Gitflow is that there is quite a lot of tooling around it. One of them is the Gitflow plugin for the Git CLI, which adds handy commands for working with Gitflow. Here is an example of how we would work with the Gitflow Plugin:
Initialize the project
Create a new empty directory and enter it. Then, initialize the project
git flow init
The tool then asks about our team’s naming convention of certain branches, but
usually, it is good to stick with the defaults. An exception here is the
master branch. There has been a change of mind in the last couple of months to
rename the master branch to main because the term “master” is politically a
bit heavy. For the rest, we can just accept the defaults.
Start a feature
To start a feature, Gitflow uses the command
git flow feature start kitten
where kitten is the name of the feature. The tool then tells us what it did.
It automatically created a new feature branch for us and switched to it. Here,
we can make our changes. As an example, we can create a file called kitten.txt
which contains the kitten’s name and commit that. By the way, if you don’t
provide the -m flag when creating a commit, Git will open your favorite text
editor to create the message, which is quite handy.
Complete the feature
To complete our kitten feature, we just type
git flow feature finish
and the tool automatically merges the feature branch back into develop and switches to it. Obviously, we skipped the step of a pull request here because we are such badass engineers and never make mistakes.
Create a release
Now that the kitten has been added, we want to release that feature. To do so, we type
git flow release start 1.0.0
where 1.0.0 is the version number of our release. Again, the tool switches to
the newly created release branch. Here we can make changes to prepare the
release. For example, create a version file that contains the current version
number. Now we’ll commit that.
Finish the release
Next, we tell the tool that our release is ready by typing
git flow release finish
The tool then prompts us to change the commit messages and to add a description to our release tag. As soon as we are done, the changes get merged back into the develop branch and also the main branch with the respective tag.
Looking at our commit log now, shows us that we have a clean history with easily readable commit messages and even one that contains a body describing the release it produced. So, in sum, we have a nicely automated process for doing Gitflow!
GitHub Flow
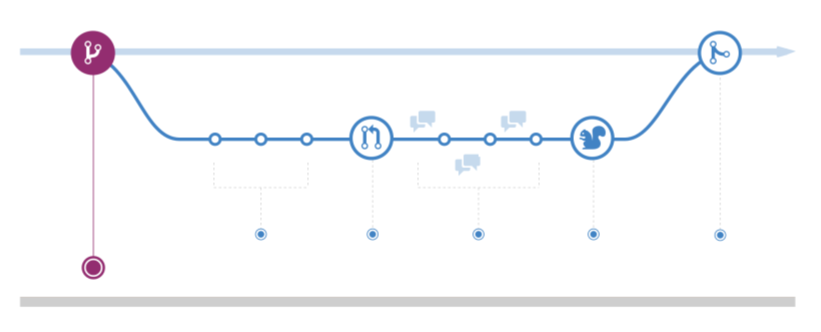
Next, we will look at another branching strategy called “GitHub Flow”. In
contrast to Gitflow, it only contains a single main branch (mostly called
master or main) which everything branches off. The main branch is used as
the working tree to branch feature branches off. The releasing of software is
also done on that single branch. This enforces a strictly linear development
process because one can only go forward and not cherry-pick specific changes
from one branch to another.
While this may be seen as a restriction by some developers, it can also be a great advantage because it makes it clearer what is released where and which sets of features belong together and into a release. People can view at a glance what features are included in which release and know how the individual releases differ. This makes the workflow simpler and less error-prone, but also a bit less flexible. It is therefore more suited for smaller, more agile teams and projects.
Merging

Next, we want to look at how we can bring changes from one branch to another. In
Git, there are two main ways of doing so: merging and rebasing. For both of them
we can start with the following example setup which you see in the top half of
the picture. Let’s assume that we have a branch named master and a branch
named topic which branches off from master at a certain commit E and makes
commits A, B and C on top of E. Meanwhile the master branch has also evolved
further from commit E with commits F and G. Now let’s assume that we want to
bring the changes from topic back to master.
If we do this using the mechanism of merging, then all changes from the topic
branch are integrated into the master branch in a single new commit H. This
new commit is commonly referred to as the merge commit. In the best case, the
commits F and G which have happened on the master branch in the meantime have
only touched parts of files which are not overlapping any parts of the files
that were touched in the commits A, B and C on the topic branch. In this case,
the merge is executed automatically by Git. In the worst case, however, the
commits on the topic branch have touched parts in files which were also
touched by the commits on the master branch. This is the dreaded merge
conflict. In this case, the person who is performing the merge is prompted to
manually merge the changes in the conflicted files.
Merge conflicts are how Git resolves the fundamental problem of several people concurrently working on the same set of files. It is fairly normal that they happen occasionally. However, if you have frequent merge conflicts in your project, this usually indicates that something is not right. Either your team might be trying to implement things which somehow contradict each other or parts of your architecture are overloaded because every change needs to touch them or people are not communicating well on who is doing what at which time. So, it’s always a good idea to reflect why a particular merge conflict is happening.
Merging has the following properties to keep in mind when comparing it to rebasing: It is very explicit regarding who performed a merge operation at what time. Since a merge is not rewriting any commit history, but only adding one new commit to the target branch, it is also safer to use on branches where many people are making concurrent changes.
Rebasing
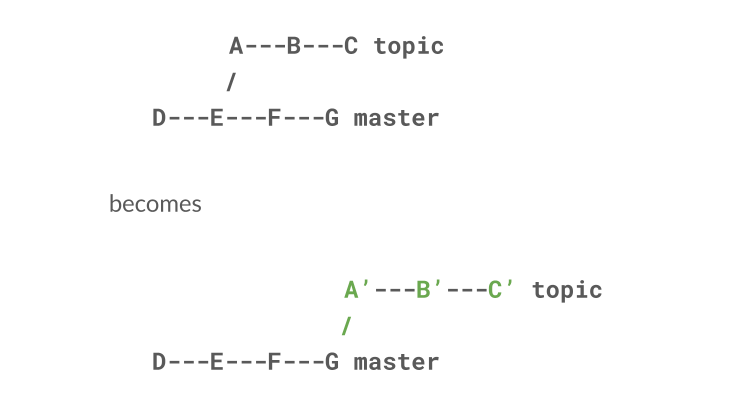
The other way of bringing changes from the topic branch back to master is
using the mechanism of rebasing. Let’s use the same example setting as before,
which you can see in the top half of the picture. Rebasing the topic branch on
the master branch means that we replay all commits from the master branch on
the topic branch. In the case of our example, this would mean applying commit
F on the topic branch and then applying commit G. As we replay each individual
commit, merging can either be done by Git automatically or a conflict arises
which has to be resolved by a human. The result of rebasing the topic branch
on the master branch is that the topic branch now contains the commits F and
G plus the commits A, B and C potentially modified during merge conflict
resolution, which is why we call them A’, B’ and C’ in the picture.
Rebasing has the following advantages: Since the commits from the source branch are sequentially reapplied to the target branch, the resulting commit history becomes a lot cleaner and easier for humans to read and understand. When rebasing, there are no merge commits cluttering up your history talking about branches that no longer exist.
Pull requests
Next we will have a look at pull requests, sometimes also referred to as merge requests, depending on which platform you are hosting your Git repos on. Indeed, pull requests are not part of Git itself, but they are featured in all major Git platforms like GitHub, GitLab or Bitbucket. Pull requests are an important tool for collaborating on Git repos and for properly implementing the branching strategies described earlier.
Submitting
So let us assume that you have implemented a new feature on a feature branch according to Gitflow.
First, we want to look at some good practices when submitting a pull request for your feature branch. Following these practices will make your reviewer’s life easier, which in turn will help you get the most out of their review.
Rebase
The first good practice you should follow is making sure that your feature branch is up-to-date with the latest changes on the target branch. After all, you want to make sure that your change works on the current version of develop and not just on a version from way back in time when you branched off your feature branch. Furthermore, you don’t want to place the burden of closing this potential gap on your reviewers. So, according to what we discussed earlier, you would now rebase your feature branch on the latest develop branch, meaning that you sequentially apply all commits that have happened on develop since the time when you created the feature branch. Let us consider an example. Assume that we are working on a Git repository which contains information on the planets of the Solar System, and that our repository initially looks as follows:
* 2119e4e (HEAD -> feature/saturn-to-neptune, origin/feature/saturn-to-neptune) Add information on planet Neptune
* cc9e0d4 Add information on planet Uranus
* 4a30b63 Removed some wrong information about planet Saturn
* dae16ab Add some more information on Saturn that I had forgotten before
* a44fd69 Add information on the planet Saturn
| * bc91108 (origin/develop, develop) Add information on the planet Jupiter
| * d11edf4 Add information on the planet Mars
|/
* d212069 Add information on the planet Earth
* 9af8451 (origin/main, main) Add information on the planet Venus
* a1b8fc5 Add information on planet Mercury
We can see the feature branch saturn-to-neptune which we are working on and
which branches off from develop at the commit which adds information on the
planet Earth. Meanwhile, someone else has added information on the planets Mars
and Jupiter on the develop branch. So, before submitting our feature branch
for review, we need to bring it up to date with those two additional commits on
develop. This we achieve by rebasing our feature branch on develop by
executing
git rebase develop
while on the feature branch. At this point, Git will prompt us to resolve any merge conflicts that might arise from integrating those two commits on our feature branch. If we are lucky, there are none. After potential merge conflicts are resolved, our repository will look as follows:
* 1d32960 (HEAD -> feature/saturn-to-neptune) Add information on planet Neptune
* f646f96 Add information on planet Uranus
* 21fdccb Removed some wrong information about planet Saturn
* 6d5b293 Add some more information on Saturn that I had forgotten before
* 1abfa9f Add information on the planet Saturn
* bc91108 (origin/develop, develop) Add information on the planet Jupiter
* d11edf4 Add information on the planet Mars
| * 2119e4e (origin/feature/saturn-to-neptune) Add information on planet Neptune
| * cc9e0d4 Add information on planet Uranus
| * 4a30b63 Removed some wrong information about planet Saturn
| * dae16ab Add some more information on Saturn that I had forgotten before
| * a44fd69 Add information on the planet Saturn
|/
* d212069 Add information on the planet Earth
* 9af8451 (origin/main, main) Add information on the planet Venus
* a1b8fc5 Add information on planet Mercury
We can see that the local copy of our feature branch is now updated with the two
additional commits from develop adding information on Mars and Jupiter.
However, the remote copy of the feature branch does not yet contain these
commits. We can correct this by force pushing our changes to the feature branch:
git push --force-with-lease
Force pushing is OK in this case because we are working on the feature branch on our own, so we are not interfering with other potential changes. This will make our repository look as follows:
* 1d32960 (HEAD -> feature/saturn-to-neptune, origin/feature/saturn-to-neptune) Add information on planet Neptune
* f646f96 Add information on planet Uranus
* 21fdccb Removed some wrong information about planet Saturn
* 6d5b293 Add some more information on Saturn that I had forgotten before
* 1abfa9f Add information on the planet Saturn
* bc91108 (origin/develop, develop) Add information on the planet Jupiter
* d11edf4 Add information on the planet Mars
* d212069 Add information on the planet Earth
* 9af8451 (origin/main, main) Add information on the planet Venus
* a1b8fc5 Add information on planet Mercury
So, we now have a nice and linear history on our feature branch, and we are almost ready to submit the feature branch for review.
Review the diff
The next good practice to follow before submitting a merge request is to review the diff which results from your changes. When doing so, you should check that you are only submitting changes which concern the feature you are building. You should take care not to mix these changes with unrelated ones, say dependency updates or code formatting, which will make it harder for reviewers to understand what’s going on. If it is not possible to separate the relevant from the unrelated changes, this is a clear sign, that you are overloading your pull request.
Clean up the commit history
Another good practice is cleaning up the commit history of the feature branch. Your reviewers should be able to use the commit history to help them understand the reason for specific changes. Therefore, your feature branch should not contain commits which resulted from trial and error and from changes which are made irrelevant by later commits. But how can we clean up the commit history in hindsight? Once again, the rebase command is helpful, this time rebasing the feature branch on itself.
Considering our example again, we see that the commit history on our feature branch currently contains three commits concerning the planet Saturn:
* 21fdccb Removed some wrong information about planet Saturn
* 6d5b293 Add some more information on Saturn that I had forgotten before
* 1abfa9f Add information on the planet Saturn
It seems that we took at few steps back and forth when making those changes, but those steps are irrelevant for the reviewer, so we want to squash them all into just one commit. We do this using the following command for starting an interactive rebase on the feature branch:
git rebase -i --root
We specify the option --root to tell Git to show us the whole history for
rebasing. This opens our favorite text editor with the Git history and allows us
to mark certain commits with a s for squashing:
pick a1b8fc5 Add information on planet Mercury
pick 9af8451 Add information on the planet Venus
pick d212069 Add information on the planet Earth
pick d11edf4 Add information on the planet Mars
pick bc91108 Add information on the planet Jupiter
pick 1abfa9f Add information on the planet Saturn
s 6d5b293 Add some more information on Saturn that I had forgotten before
s 21fdccb Removed some wrong information about planet Saturn
pick f646f96 Add information on planet Uranus
pick 1d32960 Add information on planet Neptune

# Rebase 1d32960 onto f87a562 (10 commands)
#
# Commands:
# p, pick <commit> = use commit
# r, reword <commit> = use commit, but edit the commit message
# e, edit <commit> = use commit, but stop for amending
# s, squash <commit> = use commit, but meld into previous commit
# f, fixup [-C | -c] <commit> = like "squash" but keep only the previous
#                    commit's log message, unless -C is used, in which case
#                    keep only this commit's message; -c is same as -C but
#                    opens the editor
# x, exec <command> = run command (the rest of the line) using shell
# b, break = stop here (continue rebase later with 'git rebase --continue')
# d, drop <commit> = remove commit
# l, label <label> = label current HEAD with a name
# t, reset <label> = reset HEAD to a label
# m, merge [-C <commit> | -c <commit>] <label> [# <oneline>]
# .       create a merge commit using the original merge commit's
# .       message (or the oneline, if no original merge commit was
# .       specified); use -c <commit> to reword the commit message
#
# These lines can be re-ordered; they are executed from top to bottom.
#
# If you remove a line here THAT COMMIT WILL BE LOST.
#
# However, if you remove everything, the rebase will be aborted.
#
In this case, we have decided to squash the commits 21fdccb and 6d5b293 into
1abfa9f. After exiting this dialog, Git asks us what to do with the commit
messages of the commits we are about to squash:
# This is a combination of 3 commits.
# This is the 1st commit message:

Add information on the planet Saturn

# This is the commit message #2:

# Add some more information on Saturn that I had forgotten before

# This is the commit message #3:

# Removed some wrong information about planet Saturn

# Please enter the commit message for your changes. Lines starting
# with '#' will be ignored, and an empty message aborts the commit.
#
# Date:      Fri Mar 5 22:25:09 2021 +0100
#
# interactive rebase in progress; onto f87a562
# Last commands done (8 commands done):
#    squash 6d5b293 Add some more information on Saturn that I had forgotten before
#    squash 21fdccb Removed some wrong information about planet Saturn
# Next commands to do (2 remaining commands):
#    pick f646f96 Add information on planet Uranus
#    pick 1d32960 Add information on planet Neptune
# You are currently rebasing branch 'feature/saturn-to-neptune' on 'f87a562'.
#
# Changes to be committed:
#       new file:   saturn.txt
#
In this case, we have chosen to just discard the messages of the commits which are being squashed by commenting them in the editor dialog. After confirming the dialog, we see that our repo is now in the following state:
* d61b82e (HEAD -> feature/saturn-to-neptune) Add information on planet Neptune
* 548ee1a Add information on planet Uranus
* d6db434 Add information on the planet Saturn
| * 1d32960 (origin/feature/saturn-to-neptune) Add information on planet Neptune
| * f646f96 Add information on planet Uranus
| * 21fdccb Removed some wrong information about planet Saturn
| * 6d5b293 Add some more information on Saturn that I had forgotten before
| * 1abfa9f Add information on the planet Saturn
|/
* bc91108 (origin/develop, develop) Add information on the planet Jupiter
* d11edf4 Add information on the planet Mars
* d212069 Add information on the planet Earth
* 9af8451 (origin/main, main) Add information on the planet Venus
* a1b8fc5 Add information on planet Mercury
So, the history on the local copy of our feature branch now looks clean. As a last step, we propagate this to the remote copy of the feature branch by force pushing again:
git push --force-with-lease
This will make our repository look entirely clean, ready for our reviewers:
* d61b82e (HEAD -> feature/saturn-to-neptune, origin/feature/saturn-to-neptune) Add information on planet Neptune
* 548ee1a Add information on planet Uranus
* d6db434 Add information on the planet Saturn
* bc91108 (origin/develop, develop) Add information on the planet Jupiter
* d11edf4 Add information on the planet Mars
* d212069 Add information on the planet Earth
* 9af8451 (origin/main, main) Add information on the planet Venus
* a1b8fc5 Add information on planet Mercury
Leave a clear and concise title and description
The last good practice is an elementary one. Write a clear and concise title and description, so that your reviewers immediately know the context in which you are proposing the changes. In a sense, the same rules that we have seen for single commit messages also apply here: say in a human-readable form why you are doing something. Additionally, it sometimes makes sense to add instructions for the reviewers which will guide them in reading and understanding your changes, i.e., things like “you should start by looking at the changes in awesome.go and work your way in from there”.
Reviewing
So, now that we know how to submit a pull request, let’s have a look at how to review one.
Mentally sketch your own solution first
Wrapping your head around someone else’s work can be quite daunting. A good way to achieve this is by mentally sketching your own solution to the problem at hand before starting the review. You can then use your mental sketch to guide you through the review and check for specific changes which you would expect to see or not to see. For example, when reviewing a pull request described as “Allow users to enter their birthday in their profile” your mental sketch would include the profile screen receiving a new date chooser, the profile API receiving a new date field and the profile database table receiving a new date column. Seeing a change in the shopping cart API would be unexpected and would lead you to ask the author for an explanation.
Apart from having a mental sketch of the expected solution, there are a number of further guidelines you should stick to when reviewing a pull request:
Be constructive
The first one is pretty obvious: be constructive! For every issue you spot, you should not just point out that problem, but you should have a better solution ready to propose to the author. Also, you should always remember that you are reviewing code and not the person who wrote it. Hence, your comments should address weaknesses in the code, not in the author.
Be more than a linter
The second guideline is: don’t just be a linter! The whole point of reviews is that they are performed by fellow humans who know the semantics of the problem at hand, the architecture of the system and the design decisions that have been taken to build it. So, expect to dive into the code. Spending your time on correcting indentation errors would be a waste. Indeed, the latter can be done automatically by introducing automated linting.
Also consider missing code and test cases
The third guideline is: also review what isn’t there! It often comes naturally to just look at the code changes which the author of a pull request is proposing. However, that is usually not enough. Instead, you will also have to think about what is missing. This is where your mental sketch again is beneficial. Are there any changes which you would have expected, but you are not seeing? What about tests? Are there any test cases that the author has forgotten, indicating that some boundary conditions were not considered?
Perform large reviews interactively
The last guideline is that reviews are performed interactively between the author and the reviewer whenever the pull request exceeds a certain complexity. Pairing up and having synchronous conversations between the reviewer and the author usually saves a lot of back and forth for clarifications. It also helps to avoid misunderstandings and even unnecessary emotions due to people’s different styles in written communication.
Git Hooks
Until now, we have only described best practices as conventions. In this last part, we will have a look at Git Hooks, which enable you to automate and technically enforce certain of these conventions.
Use Cases

Git Hooks are custom scripts which run at certain points during the development
process. They are defined by scripts which are placed in the .git/hooks
directory of your repo. Indeed, if you set up a new Git repo using the
git init command, then some example scripts will be automatically created for
you in that directory. There are two types of hooks, client-side and server-side
hooks.
Client-side hooks run on your machine. Innately, client-side hooks are used for checking things in code changes before these changes are allowed to propagate to a remote repository.
There are two client-side hooks which we explicitly recommend. The first one is called pre-commit. It enables you to run checks on your repository before a commit is accepted. This is the ideal place to run your linters and your tests so that no change can ever reach your repository which is not correctly following code formatting rules or which is breaking tests. Checking these things automatically will offload them from the pull request reviewer and allow them to focus on more important things.
The second client-side hook we recommend is called commit-msg. As its name suggests, it enables you to run custom code for checking the format of the commit message. Using the commit-msg hook, you can easily enforce the commit message guidelines we mentioned earlier.
Server-side hooks run on a Git server. They can be used to check changes which
are pushed to that server and possibly reject them. There are two server-side
hooks which we want to highlight. The first one is pre-receive, which can be
used to validate changes and reject them from being pushed to the repo, if
necessary. For example, you could use pre-receive to check that no one is
merging their own feature branches to develop or is using history changing
operations like force pushing on the master branch.
The second server-side hook is post-receive. This hook can be used to react to changes reaching a certain branch. For example, you might want to close a ticket whenever a feature branch is merged to develop.
Now, you might be wondering why we are not mentioning any hooks concerning pull
requests. Wouldn’t it be nice to have something like a pre-pullrequest hook to
attach logic to pull request creation or pull request approval? Indeed, it
would, and some Git platforms are offering features in this direction. However,
it is important to note that these are platform-specific and not part of Git, as
are pull requests themselves.
This brings us to the end of the first part of this GitOps blog series. We hope you enjoyed it, and we also hope that you will enjoy the second part, which will be about “Infrastructure as Code”. This next part is coming soon!